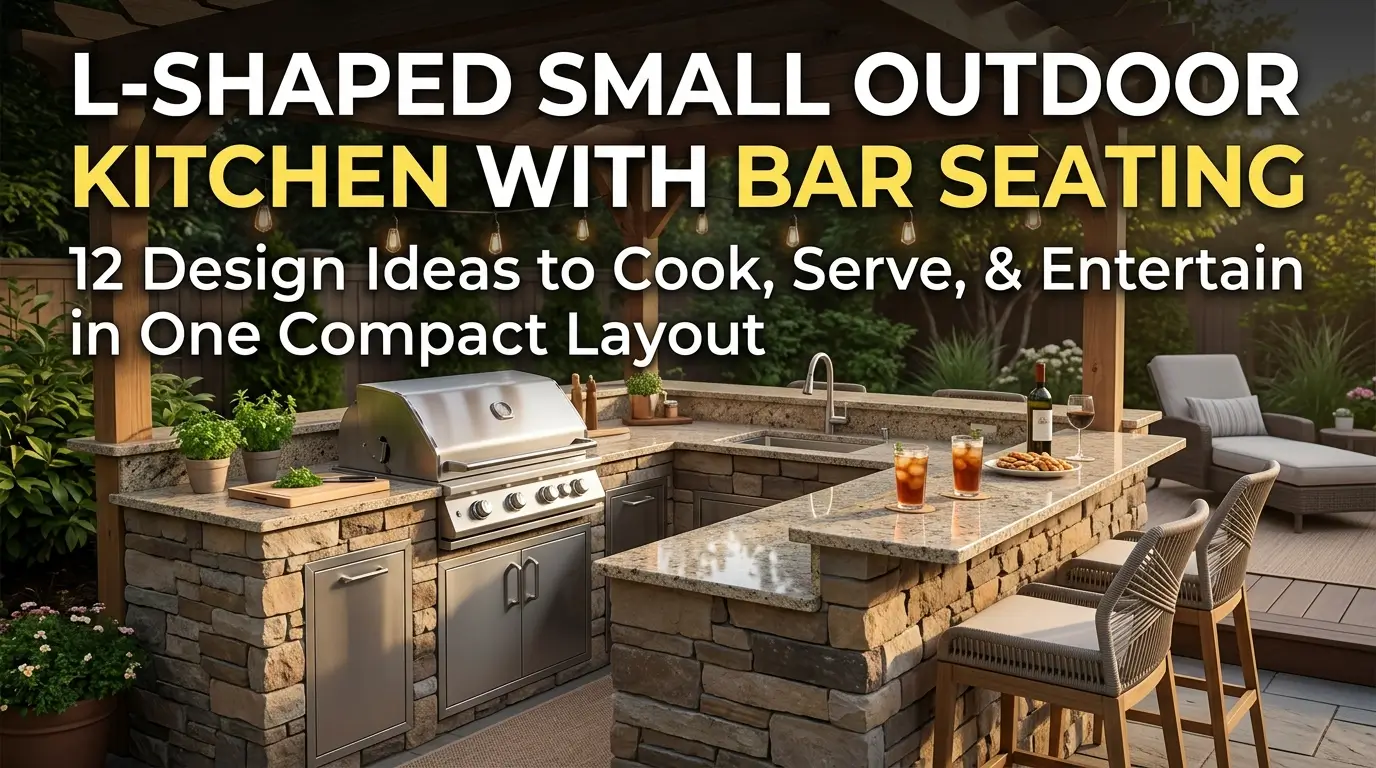
The L-shaped outdoor kitchen with bar seating is one of the most well-resolved configurations available for small outdoor spaces. It solves three problems simultaneously — cooking, storage, and entertaining — within a footprint that fits comfortably into a corner of a small garden, terrace, or backyard without consuming the entire space.
The logic is straightforward. One arm of the L handles the cooking — the burner, the grill, the prep counter, and the sink. The other arm faces outward and becomes the bar — a raised counter where guests sit, drinks are served, and conversation happens while the cooking is taking place. The cook faces the guests. The guests face the cook. Nobody is isolated in a separate kitchen while everyone else is somewhere else.
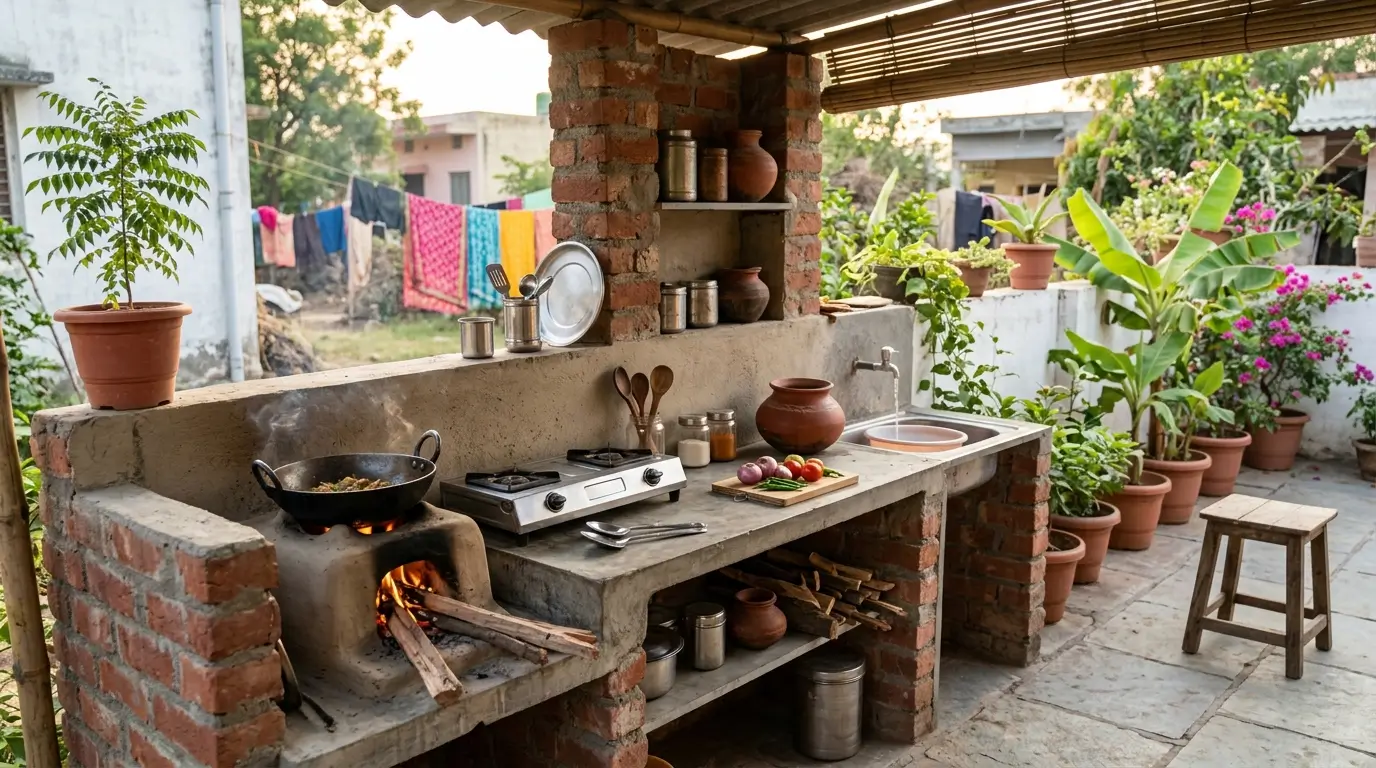
This is why the L-shaped outdoor kitchen with bar seating works so well for Indian homes and families. Indian cooking and Indian hospitality have always been social activities. The kitchen has never been a private, back-of-house operation — it is where people gather, where chai is made for whoever arrives, and where the cook and the guest occupy the same space naturally. The L-shaped layout with a bar counter formalises that dynamic in an outdoor setting and makes it work even in a very compact space.
Here are 12 design ideas to help you plan, build, and finish an L-shaped outdoor kitchen with bar seating that functions well and looks considered.
L-Shaped Outdoor Kitchen with Bar Seating Design Ideas
1. Define the Two Arms of the L from the Start
The most important planning decision in an L-shaped outdoor kitchen is how to divide the two arms. Getting this wrong — putting the bar on the wrong side, making one arm too short, or placing the cooking equipment on the bar-facing counter — creates a layout that is difficult to use and uncomfortable to sit at.
The cooking arm should run along the boundary wall or the back wall of the outdoor space. This is where the burner, grill, sink, and primary storage sit. The bar arm should project outward from one end of the cooking arm at a right angle, facing into the garden or the seating area. The bar counter is raised to bar height — 100 to 110 centimetres — while the cooking counter sits at standard kitchen height — 85 to 90 centimetres. This height difference between the two arms is what separates the cooking zone from the social zone clearly and elegantly.
2. The Corner as Active Storage
The internal corner of the L — the junction between the cooking arm and the bar arm — is the most structurally complex part of the layout and also the most storage-rich. A corner cabinet with a rotating carousel, a pull-out drawer system, or a simple open shelf accessed from the cooking side makes full use of the deep corner space without wasting it.
In an outdoor kitchen, the corner storage is best used for items that are needed frequently but should not sit on the counter — grilling tools, extra condiments, outdoor tableware, or the LPG regulator and hose. A well-organised corner cabinet keeps these items accessible from the cooking position without requiring any movement away from the counter. It is the storage equivalent of the work triangle — everything needed is within arm’s reach.
3. Bar Counter Overhang for Knee Clearance
The bar arm of the L needs to be designed with the seated guest in mind, not just the standing cook. A standard counter depth of 60 centimetres does not provide enough knee clearance for someone sitting on a bar stool on the outer face. The bar counter needs an overhang of at least 25 to 30 centimetres beyond the cabinet or base structure below it to allow guests to sit comfortably without their knees hitting the cabinet face.
This overhang is a detail that is easy to overlook at the planning stage and impossible to fix without rebuilding once the counter is in place. Build the bar arm base narrower than the counter — 35 to 40 centimetres of base with a 60 to 65 centimetre counter on top provides the correct overhang without making the structure feel top-heavy or unstable.
4. Material Consistency Across Both Arms
The L-shaped outdoor kitchen works visually because it reads as a single, unified piece rather than two separate counters joined at a corner. Maintaining the same materials across both arms — the same countertop surface, the same cabinet cladding, the same base finish — is what creates this unified reading.
Use one countertop material across the full L. One cabinet finish on the base structures of both arms. One tile or paint finish on the wall behind the cooking arm. The consistency does not need to be monotonous — the height difference between the cooking counter and the bar counter creates natural visual interest without introducing contrast in materials. Let the geometry do the work and keep the materials calm and consistent.
5. Bar Stools Scaled to the Space
Bar stools in an outdoor setting are subject to weather, frequent moving, and the general roughness of garden use. They also need to be scaled correctly to the bar counter height and to the available space — oversized bar stools in a compact outdoor kitchen make the seating area feel crowded and make movement around the cooking area more difficult.
For a bar counter at 100 to 110 centimetres, specify stools with a seat height of 65 to 75 centimetres. In a compact L-shaped layout, allow 55 to 60 centimetres of bar counter width per stool — which typically means two or three stools on a bar arm of 120 to 180 centimetres. Choose stools that stack or that can be stored compactly when the outdoor kitchen is not in use. Powder-coated steel, teak, or recycled plastic are all appropriate materials for outdoor bar stools in Indian weather conditions.
6. The Pass-Through Zone Between Cook and Guest
One of the functional pleasures of the L-shaped layout with bar seating is the natural pass-through that forms between the cooking counter and the bar counter. Dishes move from the cooking arm directly across the corner to the bar surface where guests are sitting — no carrying required, no distance covered, no separation between the cook and the table.
Design this pass-through zone deliberately. Keep a section of the bar counter clear — at least 40 to 50 centimetres — directly adjacent to the cooking arm for plating, serving, and placing drinks. Do not fill this zone with permanent accessories or decorative objects. It is a working surface and the most frequently used section of the entire outdoor kitchen. Treat it accordingly.
7. Integrated Lighting at the Bar Counter Level
Bar counter lighting — positioned at the counter level rather than overhead — creates the atmosphere that makes an outdoor bar feel like a destination rather than a countertop. LED strip lighting along the underside of the bar counter overhang, facing downward onto the stool area, provides warm, directional light at exactly the right height for comfortable evening socialising.
Combine bar-level lighting with task lighting above the cooking arm — a waterproof LED fitting directly above the burner and prep area — and ambient lighting in the wider garden. Three lighting zones, each doing a different job, make the L-shaped outdoor kitchen usable and atmospheric from dusk until the evening ends. All outdoor lighting fittings should be rated IP44 minimum for Indian outdoor conditions.
8. A Built-In Cooler or Ice Box in the Bar Arm
The bar arm of the L is the logical location for a built-in cooler or compact outdoor refrigerator. Positioned under the bar counter within easy reach of seated guests, a cooler keeps drinks cold without requiring trips indoors and gives the bar arm a genuine function beyond being a seating surface.
A built-in stainless steel ice box — a simple insulated box set into the counter with a lift-off lid — is the most affordable and most weather-resistant option for an Indian outdoor kitchen. A compact outdoor-rated electric refrigerator under the counter is more convenient but requires a power connection and a unit specifically rated for outdoor temperature fluctuations. Either way, cold drinks available at the bar counter — without leaving the outdoor space — transform the social dynamic of the outdoor kitchen entirely.
9. Overhead Structure Scaled to the L
A pergola or shade structure over an L-shaped outdoor kitchen needs to be designed in proportion to the L rather than as a separate project placed on top of it. An overhead structure that covers only the cooking arm leaves the bar seating exposed. One that is too large overwhelms the garden. The correct approach is a single overhead structure that covers the full footprint of the L — cooking arm, bar arm, and the corner — with a consistent roof line.
Fix the structure to the boundary wall at the back of the cooking arm and support the outer corners on slim steel posts positioned at the outer corners of the L. Keep the posts as slim as possible — 50 by 50 millimetre hollow section steel is adequate for most spans — to minimise their visual presence in the garden. The overhead structure should feel like it belongs to the kitchen, not like a garden feature that the kitchen happens to sit under.
10. Backsplash as a Design Statement on the Cooking Wall
The wall behind the cooking arm of the L is the most visible surface in the outdoor kitchen from the bar seating position. Guests sitting at the bar look directly at this wall while the cook works in front of it. It is the backdrop of the entire outdoor kitchen and the surface that sets the visual tone of the space.
Treat it accordingly. A bold tile choice — handmade Athangudi tiles, patterned Moroccan-style ceramic, or a large-format natural stone — on the cooking wall backsplash creates a design statement that gives the outdoor kitchen a genuine personality. Keep every other surface calm and neutral, and let the backsplash wall carry the visual interest. A considered backsplash wall behind an L-shaped outdoor kitchen is the difference between a cooking setup and a designed space.
11. Planting at the Ends of the L
The two exposed ends of the L — the end of the cooking arm against the boundary wall and the outer end of the bar arm — are natural locations for planting that soften the hard edges of the outdoor kitchen structure and integrate it into the garden.
A large pot of bamboo, a climbing plant trained up the boundary wall, or a built-in planter at the end of the bar arm brings green into the outdoor kitchen without consuming counter or floor space. Planting at the ends of the L also visually completes the composition — the kitchen reads as a finished, grounded piece rather than two counters stopping abruptly at either end. Choose plants that handle full outdoor conditions in your climate and that look good year-round rather than seasonally.
12. Consistent Flooring Under the Full L Footprint
The floor surface under the L-shaped outdoor kitchen — under both arms and the corner — should be a single, consistent material that defines the outdoor kitchen zone within the larger garden space. This could be the same material as the wider garden floor, or a contrasting material that marks the kitchen area as a distinct zone.
Concrete pavers, Kota stone, or outdoor porcelain tiles laid under the full footprint of the L create a defined platform that the kitchen sits on. This platform does two things — it protects the floor surface in the area that receives the most use and spills, and it gives the outdoor kitchen a formal, considered base that makes the entire structure feel more permanent and more intentional. A kitchen that sits on a defined floor platform looks designed. One that sits directly on garden grass or bare soil looks placed.
An Outdoor Kitchen That Brings the Cook Into the Conversation
The L-shaped outdoor kitchen with bar seating is not just a cooking layout. It is a hospitality layout. It keeps the cook connected to the guests, makes serving immediate and effortless, and turns the outdoor kitchen into the social centre of the garden rather than a functional annex at the edge of it.
Plan the two arms carefully, get the heights right, build with materials that handle the outdoors honestly, and light the space for the evening hours when it will be most used. The bar stools will rarely be empty and the cooking arm will rarely be idle.
That is exactly the point.