A bachelor kitchen has a reputation it does not entirely deserve. The assumption is that it is a neglected corner of a flat — a microwave, a kettle, and a pile of takeaway containers. The reality for most working bachelors living in Indian cities is different. You are cooking at least a few meals a week, you have limited space, and you want the kitchen to function without getting in your way.
The problem is almost never the cooking. It is the layout.
A poorly planned small kitchen creates friction at every step — the cutting board has nowhere to sit, the utensils are in the wrong drawer, the counter fills up the moment you start cooking anything with more than two ingredients. Japanese kitchen design solves exactly this kind of problem. It is a design tradition built around small footprints, efficient workflows, and the idea that a kitchen does not need to be large to function beautifully.
Here are 12 layout ideas drawn from Japanese kitchen design principles, built specifically for the small, practical needs of a bachelor kitchen.
Tiny Japanese Kitchen Layout Ideas for Bachelors
1. The Single-Wall Layout
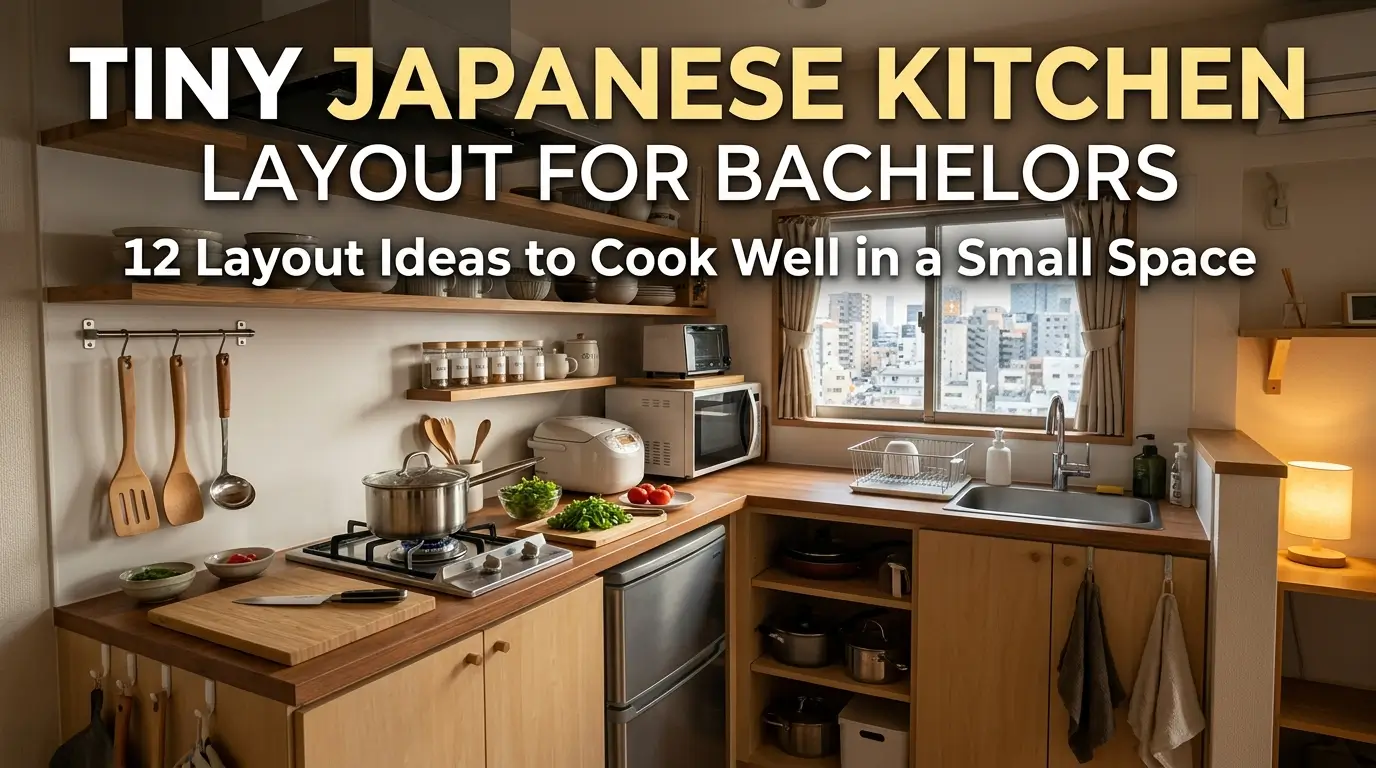
The single-wall kitchen — everything along one wall in a straight line — is the most space-efficient layout available for a small room. Sink, prep counter, cooktop, and storage all run in sequence along a single wall, leaving the rest of the room completely open.
In Japanese kitchen design, this layout is called I-gata — the I-shaped kitchen — and it is the default choice for small urban apartments across Japan. For a bachelor flat where the kitchen shares space with a living area, the single-wall layout keeps the kitchen contained without making the room feel divided. Keep the sequence logical — sink on one end, cooktop on the other, prep space in the middle.
2. The Galley Layout for Narrow Kitchens
If your kitchen is a narrow, enclosed room rather than an open-plan space, a galley layout — counters running along two parallel walls — makes the best use of the available width. One wall handles the wet work — sink, prep counter, and storage. The opposite wall handles the dry work — cooktop, storage, and possibly a small appliance area.
The galley layout is compact and extraordinarily efficient. Everything is within arm’s reach. There is no wasted movement. Japanese professional kitchens, including many small restaurant kitchens, use galley layouts for exactly this reason — the workflow is tight, logical, and fast.
3. The L-Shaped Corner Layout
For kitchens with a corner available, the L-shaped layout makes excellent use of the junction between two walls. The longer arm of the L handles the sink and prep counter. The shorter arm holds the cooktop and immediate cooking storage.
The corner itself — often wasted in poorly planned kitchens — becomes usable with a lazy Susan unit or a pull-out corner carousel. For a bachelor cooking solo, the L-shaped layout creates a natural work triangle between the sink, prep area, and cooktop that keeps everything within a few steps without crowding the space.
4. Designate a Dedicated Prep Zone
One of the most useful things you can do in a small kitchen — regardless of its overall layout — is to designate a single, protected prep zone. This is a section of counter, roughly 60 to 90 centimetres wide, that is kept completely clear at all times and used only for food preparation.
In Japanese kitchen philosophy, this connects to the concept of mise en place — everything in its place before cooking begins. A dedicated prep zone means you are never moving things out of the way before you can start cooking. It reduces friction, speeds up the process, and makes cooking in a small kitchen feel significantly less chaotic.
5. Cooktop Placement Against the Wall
In many small kitchens, the cooktop sits in the middle of the counter run — which means there is counter space on both sides but the wall behind is wasted. Moving the cooktop to the end of the counter run, against a side wall, frees up a continuous stretch of counter on one side for prep work.
This small adjustment — purely a layout decision — can meaningfully increase your usable counter space without changing anything structurally. In Japanese kitchen planning, the cooktop position is always considered in relation to the workflow around it, not in isolation.
6. Vertical Storage Above the Counter
When counter and floor space runs out, the answer is almost always to go up. Japanese kitchens make consistent use of the vertical wall space above the counter — open shelves, closed wall units, or a simple hanging rail — to store everyday items within easy reach without using any counter or floor area.
For a bachelor kitchen, a two-shelf wall unit above the prep counter can hold plates, bowls, mugs, and everyday dry goods without any of them taking up counter space. Keep the bottom shelf at a comfortable reach height — roughly 45 centimetres above the counter — and the top shelf for items used less frequently.
7. The One-Appliance Rule
Bachelor kitchens tend to accumulate appliances quickly. A rice cooker, a toaster, an air fryer, an electric kettle, a sandwich maker — each one useful on its own, collectively they consume every available surface and create a counter that is impossible to work on.
Japanese kitchen design applies strict restraint to appliances. Decide which single appliance earns a permanent place on the counter — for most Indian bachelors, this is the rice cooker or the electric kettle — and store everything else inside a cabinet. This one rule, applied consistently, keeps the counter functional and the kitchen feeling controlled.
8. Under-Counter Storage as the Primary System
In a tiny kitchen, the cabinets under the counter are the primary storage workhorse. Japanese kitchen organisation maximises this space with pull-out drawers, stackable containers, and organised zones for different categories — cookware in one section, dry goods in another, cleaning supplies in a third.
Avoid the common mistake of treating under-counter space as a dumping ground for whatever does not fit elsewhere. In a small bachelor kitchen, under-counter storage needs to be planned as deliberately as anything visible. Assign a fixed location for every category and return things to their location after every use.
9. A Compact Rolling Cart as a Second Surface
When the fixed counter is not enough — which in a tiny kitchen it often is not — a compact rolling cart provides a second work surface that can be positioned where needed and moved out of the way when the kitchen is not in use.
A slim bamboo or steel cart with a lower shelf holds everyday items, provides additional prep surface during cooking, and rolls aside when you need the floor space back. In Japanese small-space design, furniture that serves multiple purposes and moves as needed is a recurring solution to the problem of rooms that have to do too many things at once.
10. Sink Placement Near Natural Light
This is a layout detail that many people overlook but Japanese kitchen planning consistently prioritises — positioning the sink near the window or the main natural light source. Washing up, cleaning vegetables, and prep work that happens at the sink all benefit from natural light.
In a bachelor kitchen where the lighting may be a single overhead fitting, a well-positioned sink near a window makes the kitchen feel more pleasant to work in. It is a small decision at the planning stage that pays off every single day.
11. Keep the Floor Completely Clear
In Japanese home design, floor space is treated as precious. Nothing sits on the floor that does not absolutely need to — no bins tucked in corners, no stray appliances, no bags of onions and potatoes left on the ground because there is nowhere else to put them.
For a tiny bachelor kitchen, this means finding a proper storage location for everything that currently lives on the floor. A small pull-out bin inside a cabinet, a basket on a low shelf for root vegetables, hooks on the back of the kitchen door for bags and aprons. A clear floor makes a small kitchen feel dramatically larger and is easier to clean.
12. The Cooking Triangle as a Layout Foundation
Every kitchen layout decision should be made with one principle in mind — the distance between the three most-used points in the kitchen: the sink, the cooktop, and the primary storage. This is called the work triangle, and Japanese kitchen planning treats it as the foundation of any efficient small kitchen layout.
In a tiny kitchen, the goal is to keep these three points close together — ideally with no single leg of the triangle exceeding 2 metres — without having them so close that they overlap and create crowding. A well-planned work triangle means less walking, less reaching, and less frustration during cooking. In a bachelor kitchen where cooking happens quickly and without ceremony, this efficiency matters more than almost anything else.
A Small Kitchen That Works as Hard as You Do
A tiny kitchen does not have to limit what you cook or how much you enjoy cooking. The right layout — thoughtfully planned around the way you actually use the space — can make a small kitchen feel remarkably capable.
Japanese kitchen design has been solving the small-space problem for decades. The principles are not complicated. Keep the workflow logical, store things close to where they are used, protect your prep space, and resist the urge to fill every surface. Apply these ideas one at a time and the kitchen will begin to work with you rather than against you.